
The Document Manager
The Document Manager helps you to organize your data, to group documents or to filter them.
You can further access the Analyze options, which include the following tools:
-
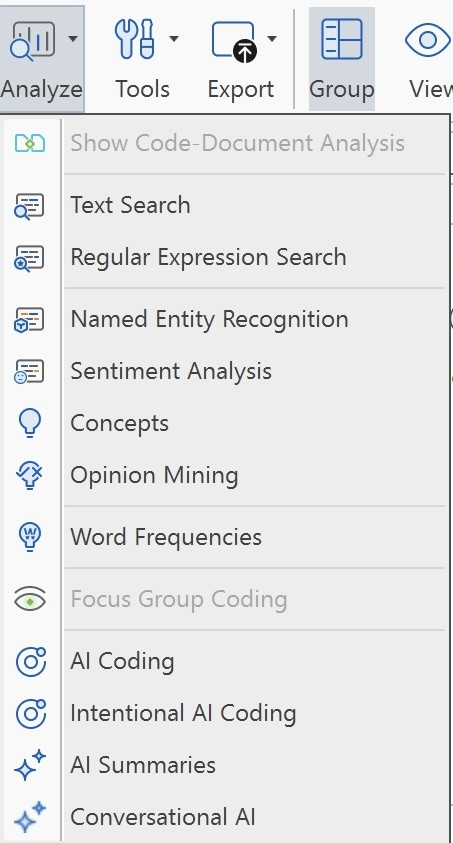
Show Code-Document Analysis
-
Search & Code tools if you want to code your data automatically:
-
The Word Frequencies (Word List and Word Cloud) for exploring your document
-
Focus group coding tool to auto code speaker units or other structural information on your data.
-
You can create reports or view geo locations in Google Maps.
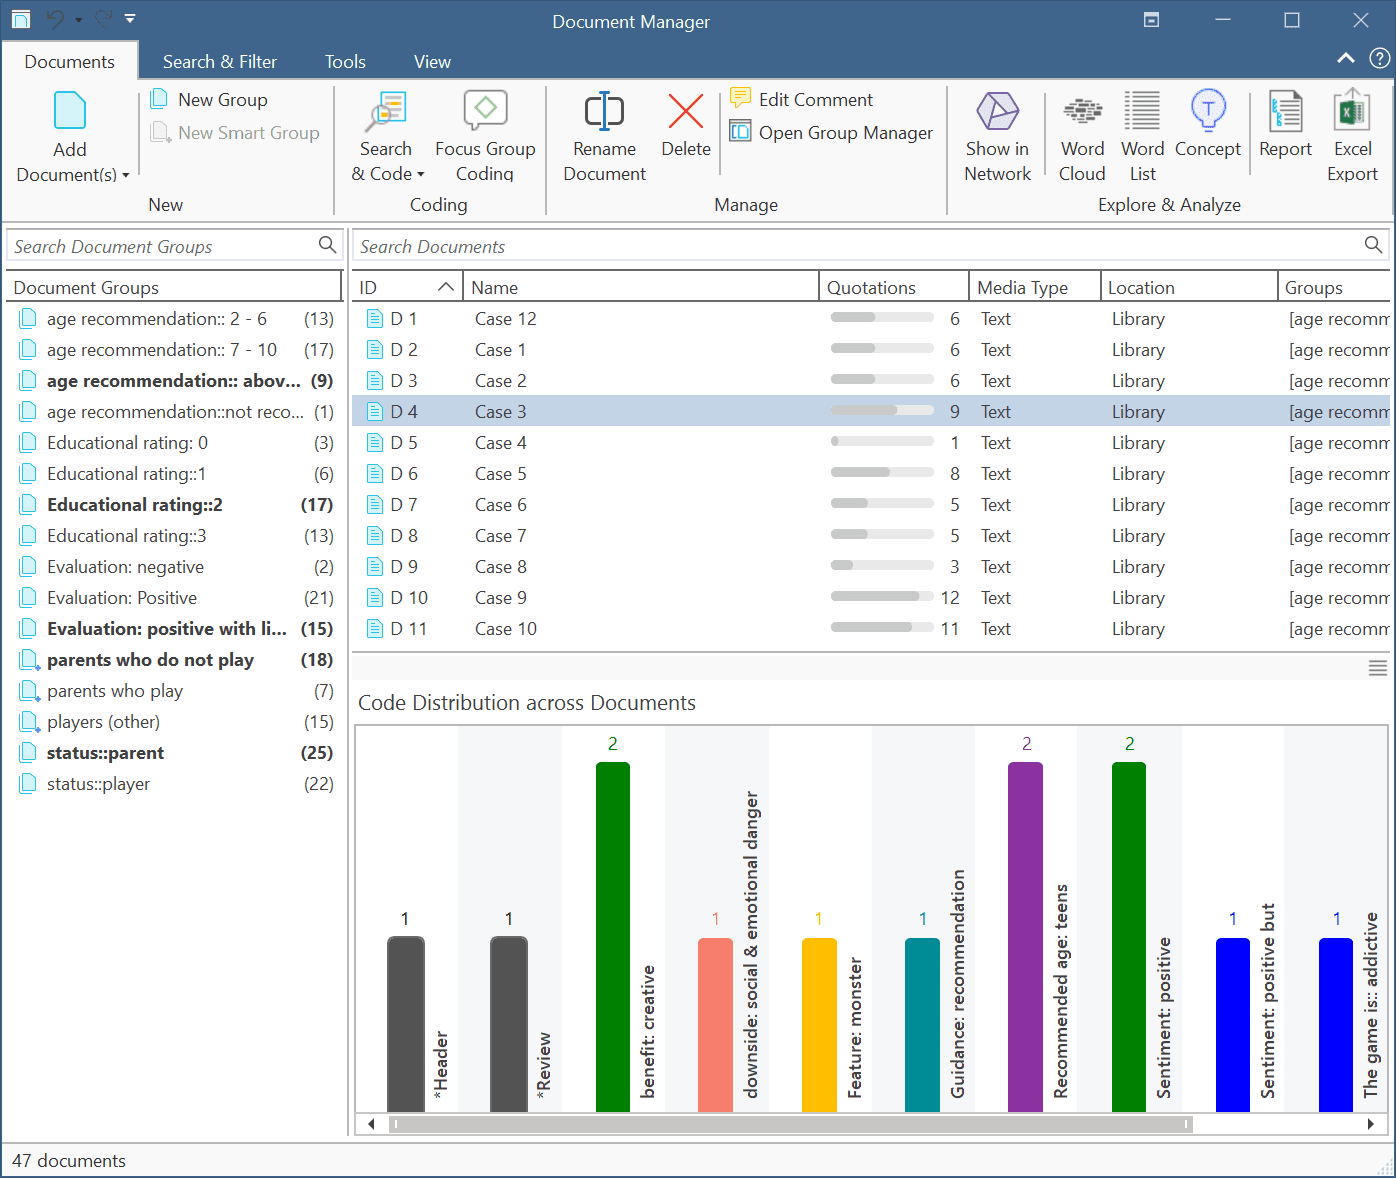
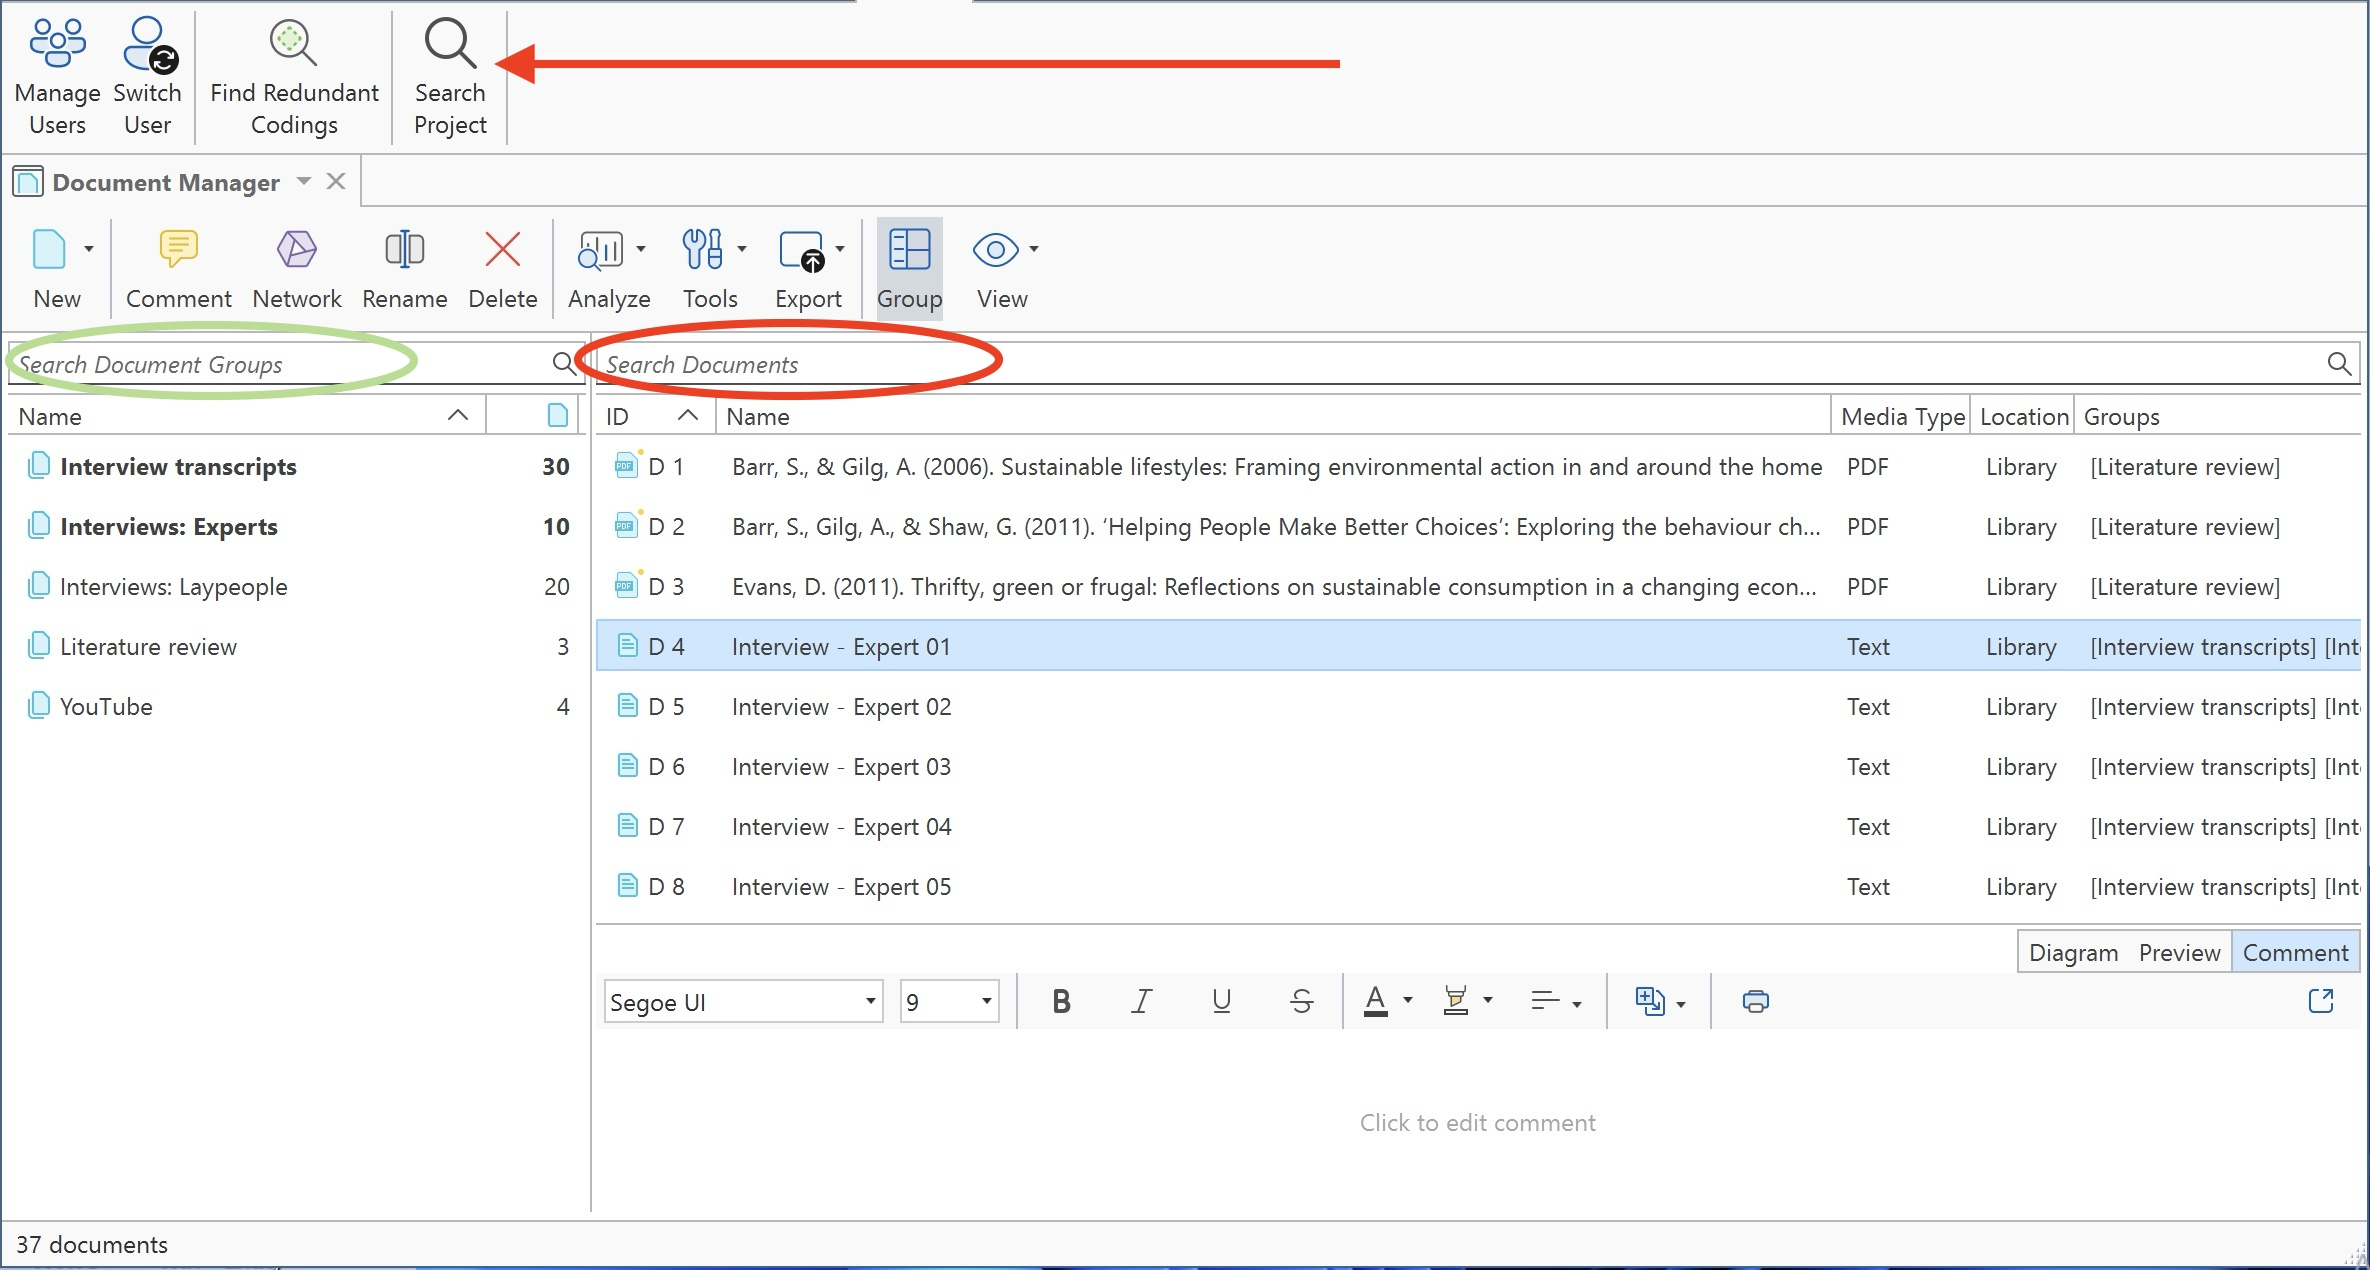
Status Bar: The status bar at the bottom of the screen shows how many documents there are in the project.
ID: The first column shows the blue document icon, and the document number. The document number is a consecutive number given to the document by ATLAS.ti when it is added to a project.
Name: The default name is the file name of the original source file that you added to the ATLAS.ti project. You can rename each document if you prefer a different name.
Location: Here you see whether a document is stored in the ATLAS.ti library or whether ATLAS.ti opens it from a linked location. For further information see Adding Documents.
Below the document list you see a Code Distribution across Documents. You can switch between seeing a document preview or the bar charts.
Filter
Click on one or more document groups in the filter area on the left to set a local filter. This means only the items in the manager are filtered.
If you want to filter the entire project, right-click on a document group to set a global filter. See Applying Global Filters For Data Analysis.
The Document Manager Ribbon

From left to right:
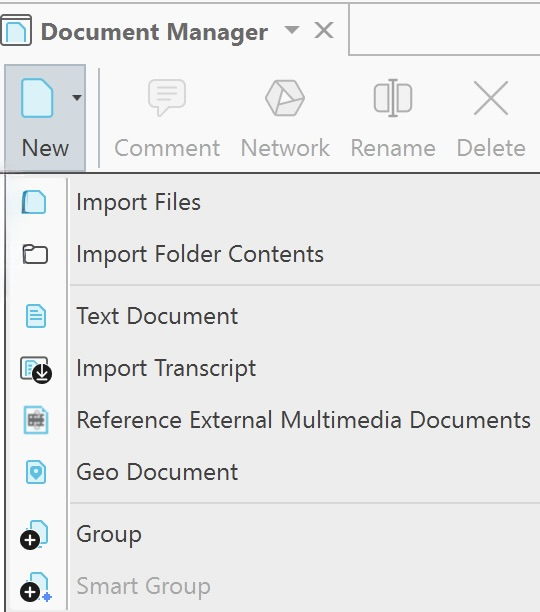
New: Under the "New" option, you can:
- Import files
- Import folder contents
- Add a new document folder
- Create a new text document
- Import transcripts
- Reference external multimedia documents
- Add geo documents
- Create document groups and smart groups
Comment: Open a text editor for writing or editing a comment for a selected document. See Working With Comments And Memos.
Network: Open a network on the selected document(s). The network only contains documents and does not display links yet. This option is for instance useful if you want to compare cases. See Analytic Functions in Networks.
Rename: When adding a document to an ATLAS.ti project, the default name is the file name. You can change this name internally in ATLAS.ti. It does not change the name of data file.
Delete: Remove selected document(s) from a project. This is a permanent deletion. It also means that all coding done on the document(s) is deleted. You can revert the action using UnDo, but only within the currently active session
Analyze:
-
Show Code-Document Analysis
-
Search & Code tools if you want to code your data automatically:
-
The Word Frequencies (Word List and Word Cloud) for exploring your document
-
Focus group coding tool to auto code speaker units or other structural information on your data.
Tools Tab
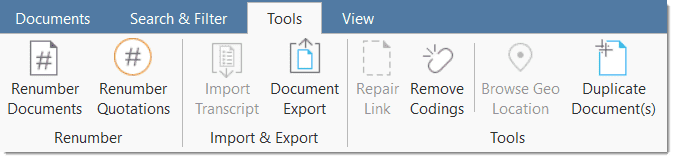
Renumber Documents: When adding documents to a project, they are numbered by ATLAS.ti in consecutive order. If you remove one or more documents, this may result in gaps. Use this option to close these gaps.
You can also use this option to re-order documents the way you want them to be ordered. To achieve this, rename the document in a way so that sorting them by name results in the order you want them to be in. Next click on the 'name' column to sort the documents by name and then select the 'renumber' option. The document numbers will then follow the alphabetical order. See also Managing Documents.
Renumber Quotations: Selecting this option will close any gap in the numbering of quotations.
Each quotation that you create has an ID. The ID consists of the document number, and a number indicating the chronological order when the quotation was created. For example, the ID 3:12 means that this quotation is in document 3 and that it was the twelfth quotation that was created in this document.
If you delete quotations or modify them, the ID does not change. If you delete a quotation with the ID 3:11, this does not mean that quotation 3:12 automatically becomes quotation 3:11. Such an automatism is not always desired. If you for instance have already started the writing process and made reference to some quotations using their ID, you would not want ATLAS.ti to change the IDs automatically.
If you do want all quotations to be numbered in sequential order, you need to evoke it manually by selecting the Renumber Quotations option.
Repair Link: If you have linked an audio or video file to a project, and the link is no longer valid, you can repair the link using this option.
Remove Codings: You can use this option if you want to unlink all codes from all quotations. This means all quotations and all codes remain in the document, but none of the quotation is coded. This is useful at times for team projects and inter-coder agreement analysis.
Browse Geo Location; All geo documents are based on Open Street Map or Bing. If you want to see a geo-location in Google Maps, you can use this option. See Working With Geo Docs.
Duplicate document(s): This allows you to create an exact copy of one or more documents with all quotations, codes, links, ect. This can be useful if for instance you want to code a document based on different aspects. This option will allow you to split a document, also when it is already coded. You duplicate it first, then (entering edit mode) you delete the second part of one document, and the first part in the other.
Export
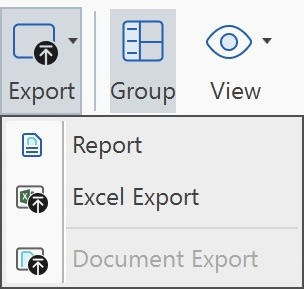
Report / Excel Export: Reports can be created as text file (Word, PDF), or in Excel format. All reports are customizable. See Creating Reports.
Document Export: This option allows you to export your documents as external data files. Text files are exported as Word docx files, all PDF. image and multimedia files in their original format.
Many of the options available in the ribbon are also available from the context menu of a document.
Groups
In the Document Manager, you’ll find a Group button that controls the visibility of document groups. By default, document groups are displayed. Clicking the Group button will hide the document group section. Clicking it again will show the document groups once more.
Search & Filter/ View Tab
The search function is now available under Search Project in the Tools menu at the top.
The filter area on the left-hand side can be used to quickly access and filter the elements listed in the managers via groups. They allow immediate access to fundamental activities like selecting groups, creating groups and smart groups, and setting local and global filters. This allows a much more effective integration into the workflow and saves a lot of mouse movements and clicks. It is also possible to run simple Boolean queries in entity managers.
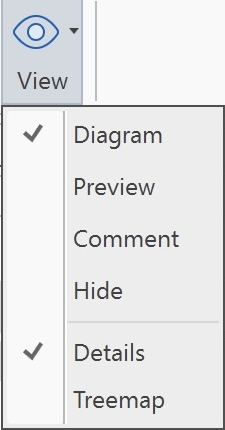
By default, the document groups are shown on the left-hand side, the document list in the detail view and a comment field below the list. Below the document list you see a Code Distribution across Documents. To change between diagram, document preview, and comment view, select either Diagram, Preview, or Comment in the segmented control at the top-right corner of the bottom pane.
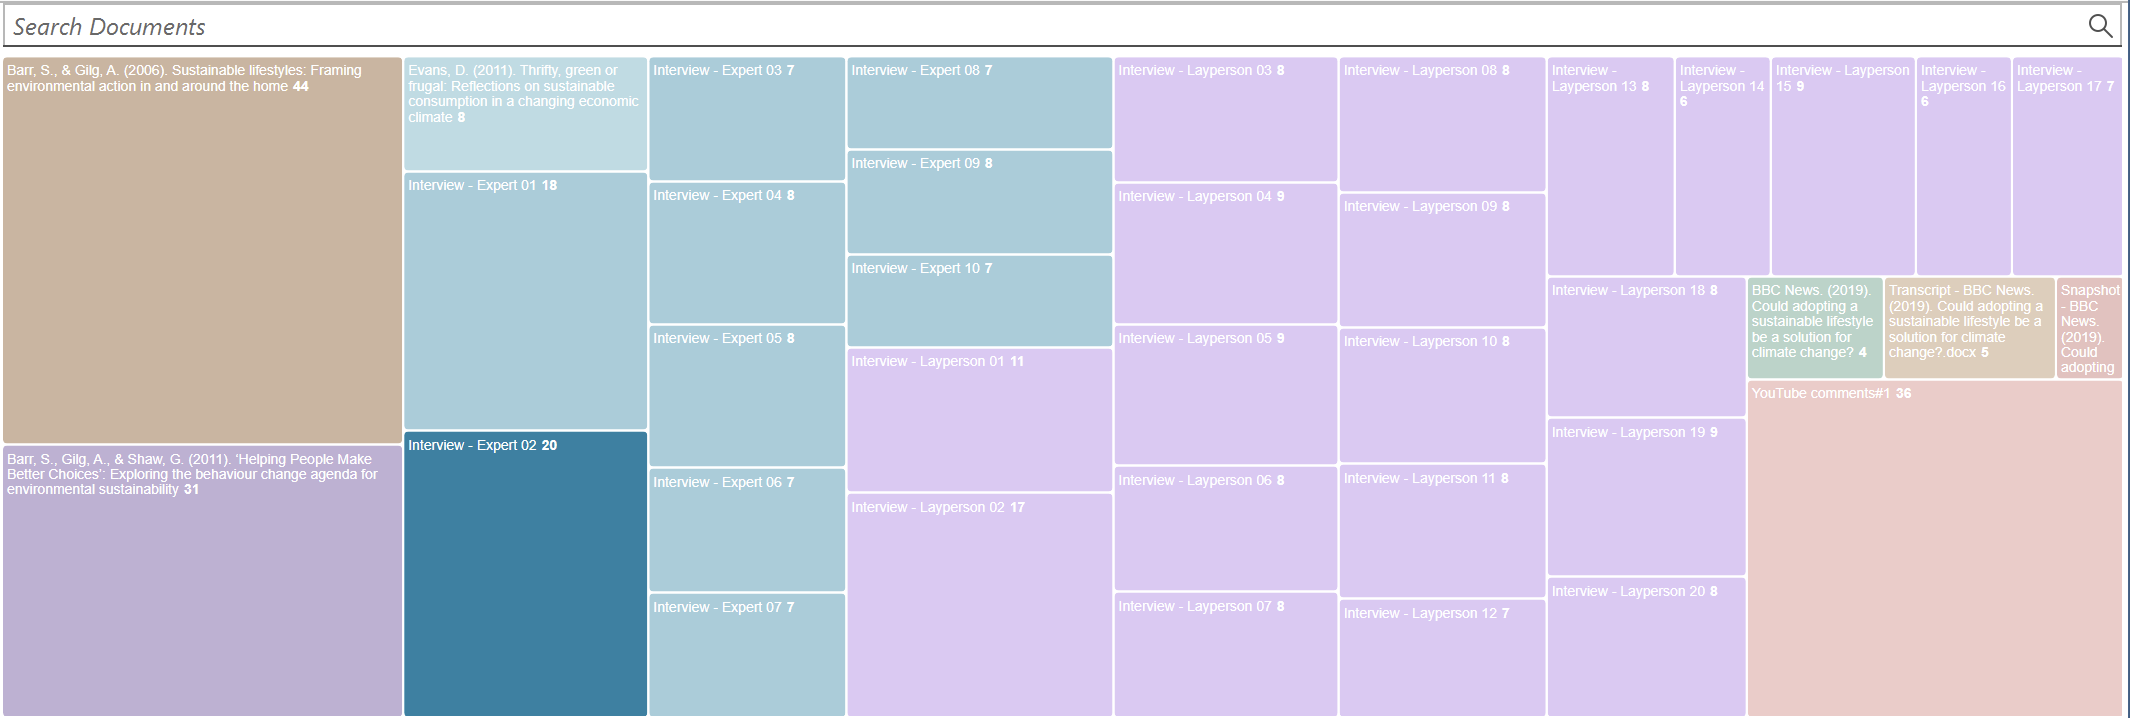
You can also display view documents as a list (default), or a treemap.
Organizing Documents in Folders
Documents can be organized into folders. Folders can be contained in other folders. There might be projects that require different levels of document organization. Below is an example with three levels:
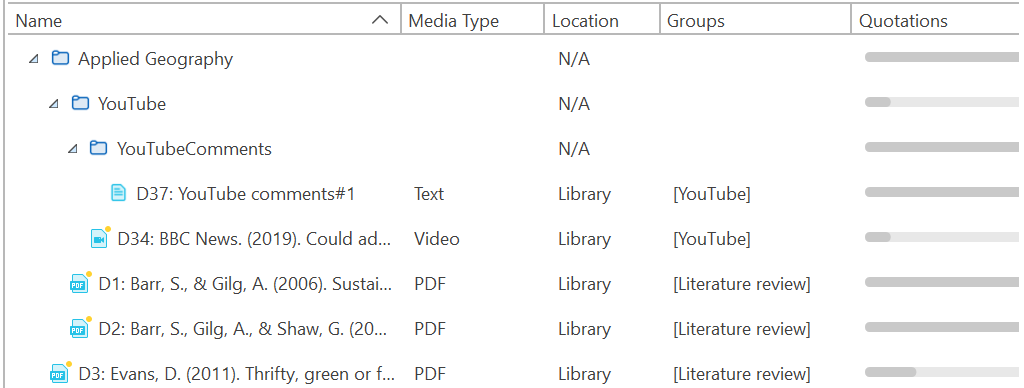
In contrast to groups, a document cannot be in more than one folder. The folder structure is hierarchical; groups are not.
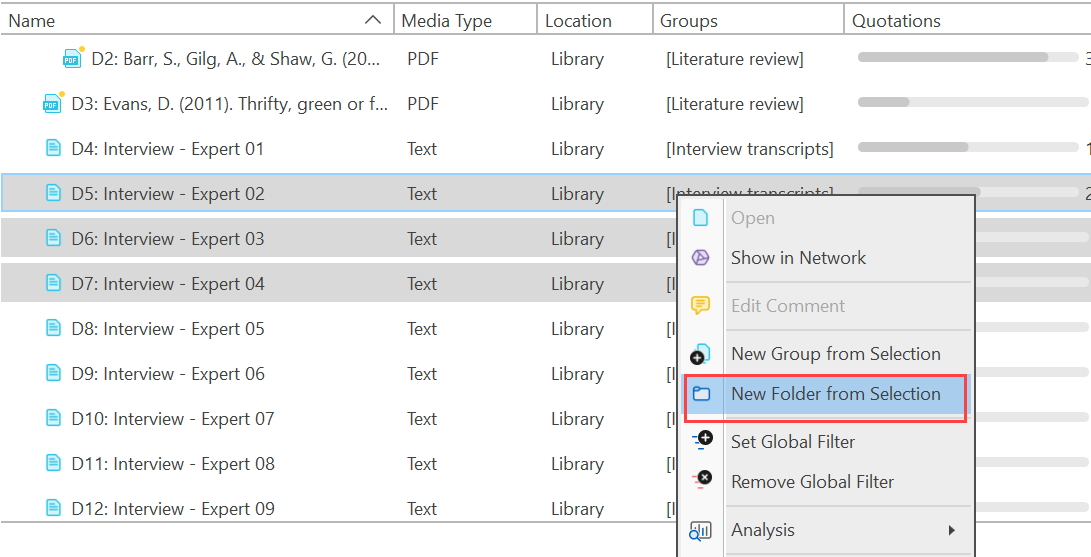
How to create folders
In the Document Manager ribbon, click New and select Folder.
Or:
Select one or more documents, right-click and select the option New Folder from Selection from the context menu.
If you delete a folder, all content in the folder is also deleted.