
Code Manager
The Code Manager is frequently used to:
- create and modify codes
- code data segments via drag & drop
- set code colors
- retrieve coded data segments
- organize them in code groups
- merge and to split codes
- filter them
- review them in networks
- review its content using word clouds, word lists and treemaps
- create reports.

In the bottom pane below the code list, you can either view a diagram, a quotation preview for a selected code, or the code comments. For more information about the diagram, see Code Distribution Over Documents.
To change between diagram, quotation preview, and comment view, select either Diagram, Preview, or Comment in the segmented control at the top-right corner of the bottom pane.
Good to know
Groundedness: Code frequency or groundedness. It shows how many quotations are linked to a code.
Density: Number of linkages to other codes. See Linking Nodes.
Colors: If you add code colors, a colored circle is displayed in front of the code icon and name. Code colors also have an effect on the display of code nodes in networks. See Working with Networks.
If you do not want to see all columns, right-click on a column header and deselect, what you do not want to see.
Selection behaviour
A double click on a code opens the list of linked quotations in the Quotation Reader You can browse through the list of quotations and view them highlighted in the context of its document. If there is only one quotation linked to a code, it will immediately be highlighted in the context of its document.
Single-click: Selects a code. If you have written a definition for the selected code, it is displayed in the comment pane below the list. Once selected, the code can be used for drag & drop coding, or you can add it to a code group via drag & drop.
Multiple Selection: You can select more than one code at a time by holding down the Ctrl or Shift key. This is useful to:
- delete multiple codes
- code a data segment with multiple codes
- open a network that includes all selected codes
- create reports based on the selected codes
- assign multiple codes to a code group or to remove them from a group
- create a new code group based on the selected codes
Drag & Drop
You can use the Code Manager as a convenient tool for coding by dragging codes onto a highlighted piece of data. If you drag codes onto another code within the same list pane, code-links will be created. If you drag a code on top of another code in the margin area, it will be replaced.
Filter
Click on one or more code groups in the filter area on the left to set a local filter. This means only the items in the manager are filtered. If you want to filter your entire project, then you need to set a global filter. See Applying Global Filters for Data Analysis.
Status Bar: The status bar at the bottom shows how many codes there are in the project.
Code Manager Ribbon

From left to right:
New
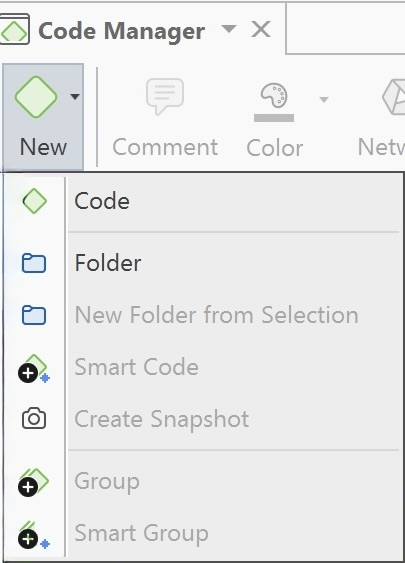
Code: Add a new code to your project.
Folder: Add a new code folder to your project.
New Folder from Selection: Add a new code folder which will contain the current selection.
Smart Code: If you select two or more codes in the Code Manager, you can create ORed smart codes i.e., a smart code that combines all selected codes with the OR operator. For further information see Working with Smart Codes .
Create Snapshot: You can create a 'snapshot' of a smart code to turn it into a regular code again with real links to quotations. The word snapshot indicates that it conserves the state of the smart code. See Creating Snapshot Codes.
Group: Create a new code group based on a selection you have made.
Smart Group: Smart Groups are a combination of existing groups using Boolean operators. For further information see Working with Smart Groups.
Color: Select a color for one or more selected codes.
Network: Open an ad-hoc network with the selected code that shows all existing links. See Opening ad-hoc Networks.
Rename: When building a code system, it is often necessary to rename a code.
Delete: Delete the selected code(s).
Edit Comment
Open a text editor for writing or editing a comment for a selected code. See Working with Comments and Memos.
Color
Select a color for one or more selected codes.
Show in Network
Open an ad-hoc network with the selected code that shows all existing links. See Opening ad-hoc Networks.
Global Filter
Set the global filter based on the current selection or remove the global filter.
Rename
When building a code system, it is often necessary to rename a code.
Delete
Delete the selected code(s).
Analyze
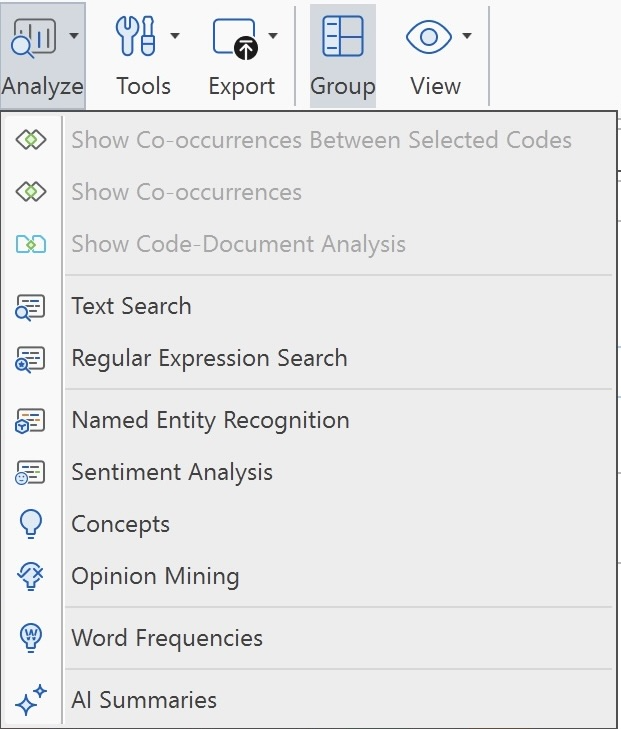
Show Co-occurrences Between Selected Codes: Select the desired codes, then choose this option to be redirected to the Code Co-occurrence Analysis Table. The results will display co-occurrences only between the selected codes. For more information, see Code-Co-occurrence Table.
Show Co-occurrences: Select the desired code(s), then choose this option to be redirected to the Code Co-occurrence Analysis Table. The results will display all codes that co-occur with the selected code(s). For more information, see Code-Co-occurrence Table.
Show Code-Document Analysis: Select the desired code(s), then choose this option to be redirected to the Code-Document Analysis Table. For more information, see Code-Document Table.
Text Search: Select the desired code(s), then choose this option to be redirected to the Text Search window, with the selected code(s) automatically preselected by default. For more information, see Text search and Auto-Code.
Regular Expression Search: Select the desired code(s), then choose this option to be redirected to the Text Search with Regex window, with the selected code(s) automatically preselected by default. For more information, see Expert Search with Regex.
Named Entity Recognition: Select the desired code(s), then choose this option to be redirected to the Text Search with Named Entity Recognition window, with the selected code(s) automatically preselected by default. For more information, see Named Entity Recognition (NER).
Sentiment Analysis: Select the desired code(s), then choose this option to be redirected to Sentiment Analysis window, with the selected code(s) automatically preselected by default. For more information, see Sentiment Analysis.
Concepts: Let ATLAS.ti find concepts in your data that you then can review and autocode. See Find Concepts.
Opinion Mining: Select the desired code(s), then choose this option to be redirected to Opinion Mining window, with the selected code(s) automatically preselected by default. For more information, see Opinion Mining.
Word Frequencies: Visualize the frequency of words as a word cloud, list, or treemap. In a word cloud, the more frequently a word occurs, the larger the word is displayed in the image. This is an exploratory tool that allows you to gain a quick insight into your data by showing you the frequencies of the words that are coded with the selected code(s). See Creating Word Clouds and Word Lists.
AI Summaries: Select the desired code(s), then choose this option to be redirected to AI Summaries, with the selected code(s) automatically preselected by default. For more information, see AI Summaries.
Tools
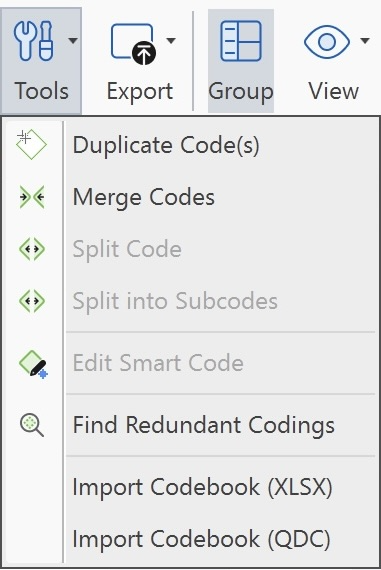
Duplicate Code(s): This option duplicates an existing code with all it links. It is a 1:1 clone of the original. Before the code splitting function became available it was a helpful first step for splitting. Now this is no longer necessary. However, you might find some other usages for it. See Working with Codes.
Merge Codes: This option allows you to merge two or more codes into one code. If the codes have a comment, it will be added to the merged code. In addition, information about which codes were merged will be added to the comment of the merged code as an audit trail. Also see Merging Codes.
You need to select multiple codes (i. e. all the codes that you want to merge) in order for the Merge option to be enabled.
Split Code: The split code function supports you in developing sub codes for a category. See Splitting a Code.
Split into Subcodes: TBA
Edit Smart Code: A smart code is a saved query. If you want to see the query that the smart code is based upon or edit it, use this option. For further information see Working with Smart Codes .
Find Redundant Codings: It can happen that you code a longer segment and then within this segment you code a segment using the same code again. This is redundant.
ATLAS.ti can find all those instances for you to help you clean up your coding. It is a helpful option when working in teams where redundant codings may occur after merging. See Finding Redundant Codings .
Import Codebook: A codebook including codes and code colors, code definitions and code groups can be imported in two formats: Excel and the QDPX exchange format. See Importing & Exporting Code Lists and QDPX Universal Data Exchange.
Export
Report / Excel Export: Reports can be created as text file (Word, PDF), or in Excel format. All reports are customizable. See Creating Reports.
Export Codebook: A codebook including codes and code colors, code definitions and code groups can be exported in two formats: Excel and the QDPX exchange format. See Importing & Exporting Code Lists and QDPX Universal Data Exchange.
Filter
The options in the Filter button menu are the same as in all other managers, and are discussed here: Entity Managers.
Code Groups
Shows or hides the code groups in the left pane. See Working with Groups for more detail.
View
By default, the code groups are shown on the left-hand side, the code list in the detail view and a comment field below the list. You can also display view codes as a list (default), a bar chart, a code cloud or a treemap:
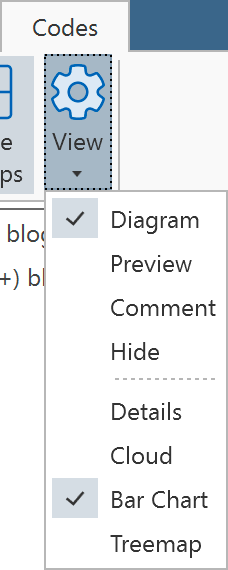
By default, the code groups are shown on the left-hand side, the code list in the detail view and a comment field below the list. You can also display view codes as a list (default), a bar chart, a code cloud or a treemap:
Code List as Cloud
Select the Cloud menu item to visualize your code list as a word cloud:

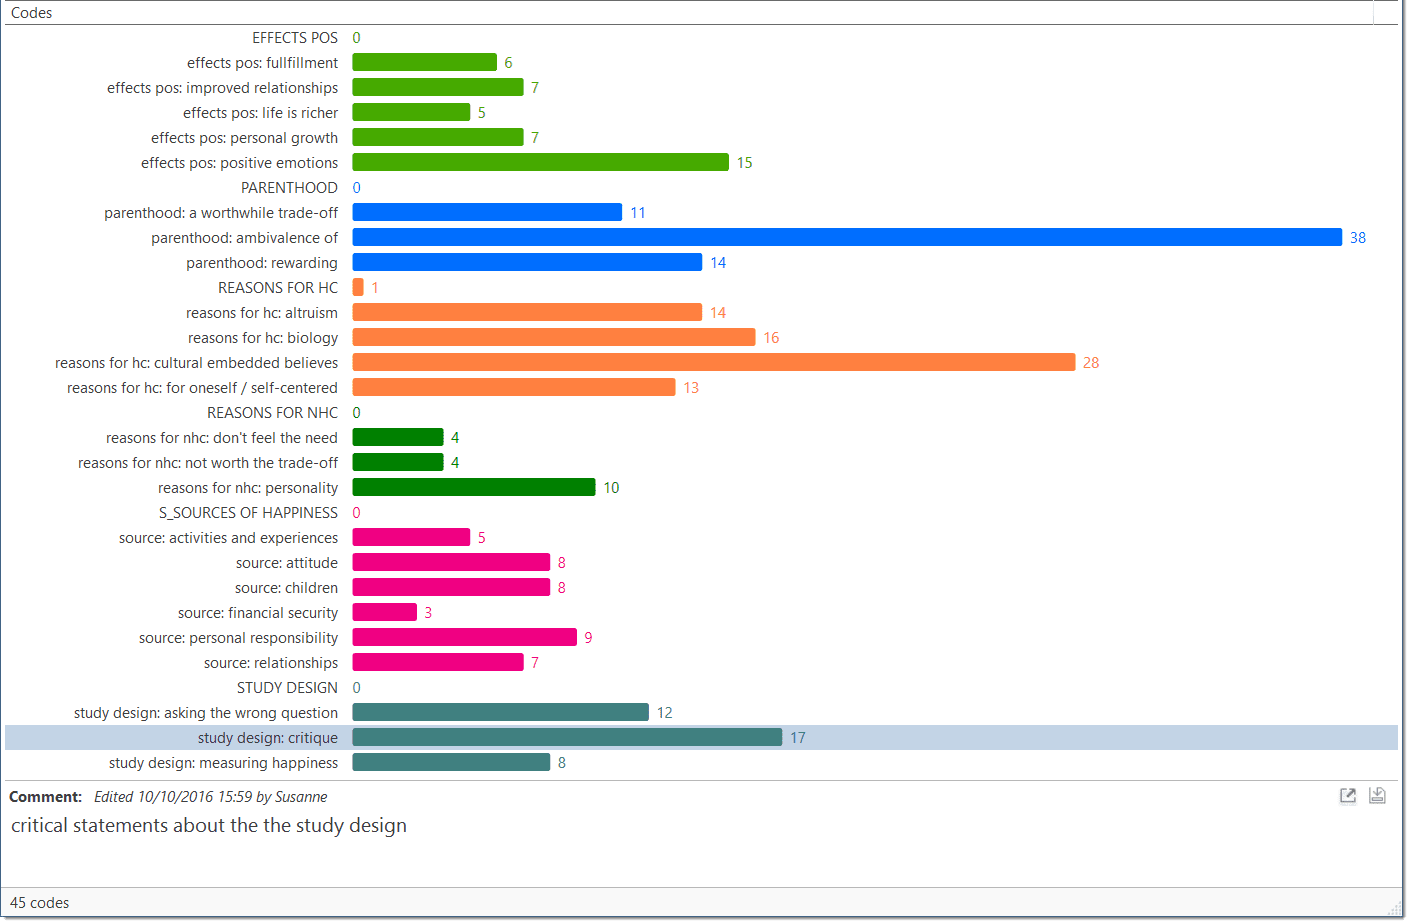
Code List as Bar Chart
Select the Bar Chart menu item to visualize your code list as a bar chart:
Code List as Treemap
Select the Treemap menu item to visualize your code list as a treemap:

Right-clicking on a code in the bar chart, cloud or treemap views opens the same context menu as in the list view. This enables you to work with the same actions, e. g. renaming codes, splitting and merging codes, or opening a network with one or multiple codes.