
AI Integration via MCP
The ATLAS.ti MCP integration lets you work with your ATLAS.ti projects through an AI assistant of your choice, using plain, natural language. Unlike AI tools that only see the documents or text you hand them, an assistant connected through MCP can work on your entire project – documents, codes, quotations, memos, networks, and groups – and save its results straight back into ATLAS.ti.
In other words, the AI becomes a collaborator inside your research, rather than a chat window beside it. Everything it does is saved in your project, and because ATLAS.ti has unlimited undo, the assistant can never break your work – you are always in control.
What is MCP?
MCP stands for Model Context Protocol, an open standard that connects AI assistants to external applications and data. You can think of it as a common language that lets an AI client and a program like ATLAS.ti talk to each other.
ATLAS.ti includes a built-in MCP server. Once you connect a compatible AI client to it (see Tested AI Clients), the AI can understand your requests and use ATLAS.ti's features on your behalf.
Despite the name, the ATLAS.ti MCP server is not something on the internet. It is a small service that runs on your own computer as part of ATLAS.ti, and it can only be reached from your machine. “Server” here simply means the part that listens for requests from your AI client – not a website or a cloud service.
What you can do with it
Through the MCP integration, an AI assistant can both explore your projects and make changes to them. For example, you can ask it to:
- Find and review your work – list and open projects, browse documents, codes, memos, networks, quotations, and groups, and read the contents of documents and memos.
- Code and annotate – create codes, apply or remove codes on quotations, set code colors, add comments, and link memos to other items.
- Organize your project – create groups and folders, move items into them, and rename or delete entities, including restructuring a messy codebook.
- Bring in new material – create memos and text documents, import documents and transcripts, and convert documents to transcripts.
Because the assistant works across your whole project at once, tasks that would otherwise take hours of manual work – comparing a theme across all your interviews, reorganizing a sprawling codebook, or sorting documents into groups – can often be done in a single conversation, with the results saved straight back to your project.
Because the assistant can also rename and delete items, treat it as you would any capable collaborator: review the changes it proposes. ATLAS.ti's unlimited undo means any change can be reversed.
A good way to get started is to open a project, then ask your AI client something simple such as “List all the codes in my current project” or “Summarize the memos in this project.” From there you can move on to richer tasks, for example “I have 200 codes – some are very similar. Help me get below 100” or “Read these interviews, create document groups by age bracket, and sort the documents into them.”
Your data and data ownership
A central idea of the MCP integration is that you choose the AI, and you decide where your data goes.
The MCP server runs locally on your own computer and is protected by a private access key. It is also turned off by default and runs only after you explicitly enable it in ATLAS.ti. Using the MCP integration does not send your projects to ATLAS.ti or Lumivero servers – no ATLAS.ti cloud is involved in MCP at all. (This applies to the MCP integration specifically; ATLAS.ti's other AI features – such as Conversational AI, AI coding, and AI summaries – use ATLAS.ti's cloud services and are separate from MCP.) Where your data goes depends entirely on the AI client you connect:
- You connect a cloud AI client (for example, Claude Desktop). To answer your requests, that client sends the relevant information – including the parts of your project the assistant reads – to its own AI provider. This is handled under your own agreement with that provider, exactly as if you used that AI on its own. ATLAS.ti is not in the middle. This also means you can connect an AI service your institution has approved or contracted (for example, under an Ethics Review Board or IT policy), so you can use AI assistance without violating your data-governance requirements.
- You connect an AI client that runs a local model (for example, LM Studio or Ollama running a model such as Llama or Mistral on your own machine, or a model your institution hosts). In this case no data leaves your computer at all – the model runs locally, the MCP server is local, and your project stays on your machine.
The following diagram shows both paths:
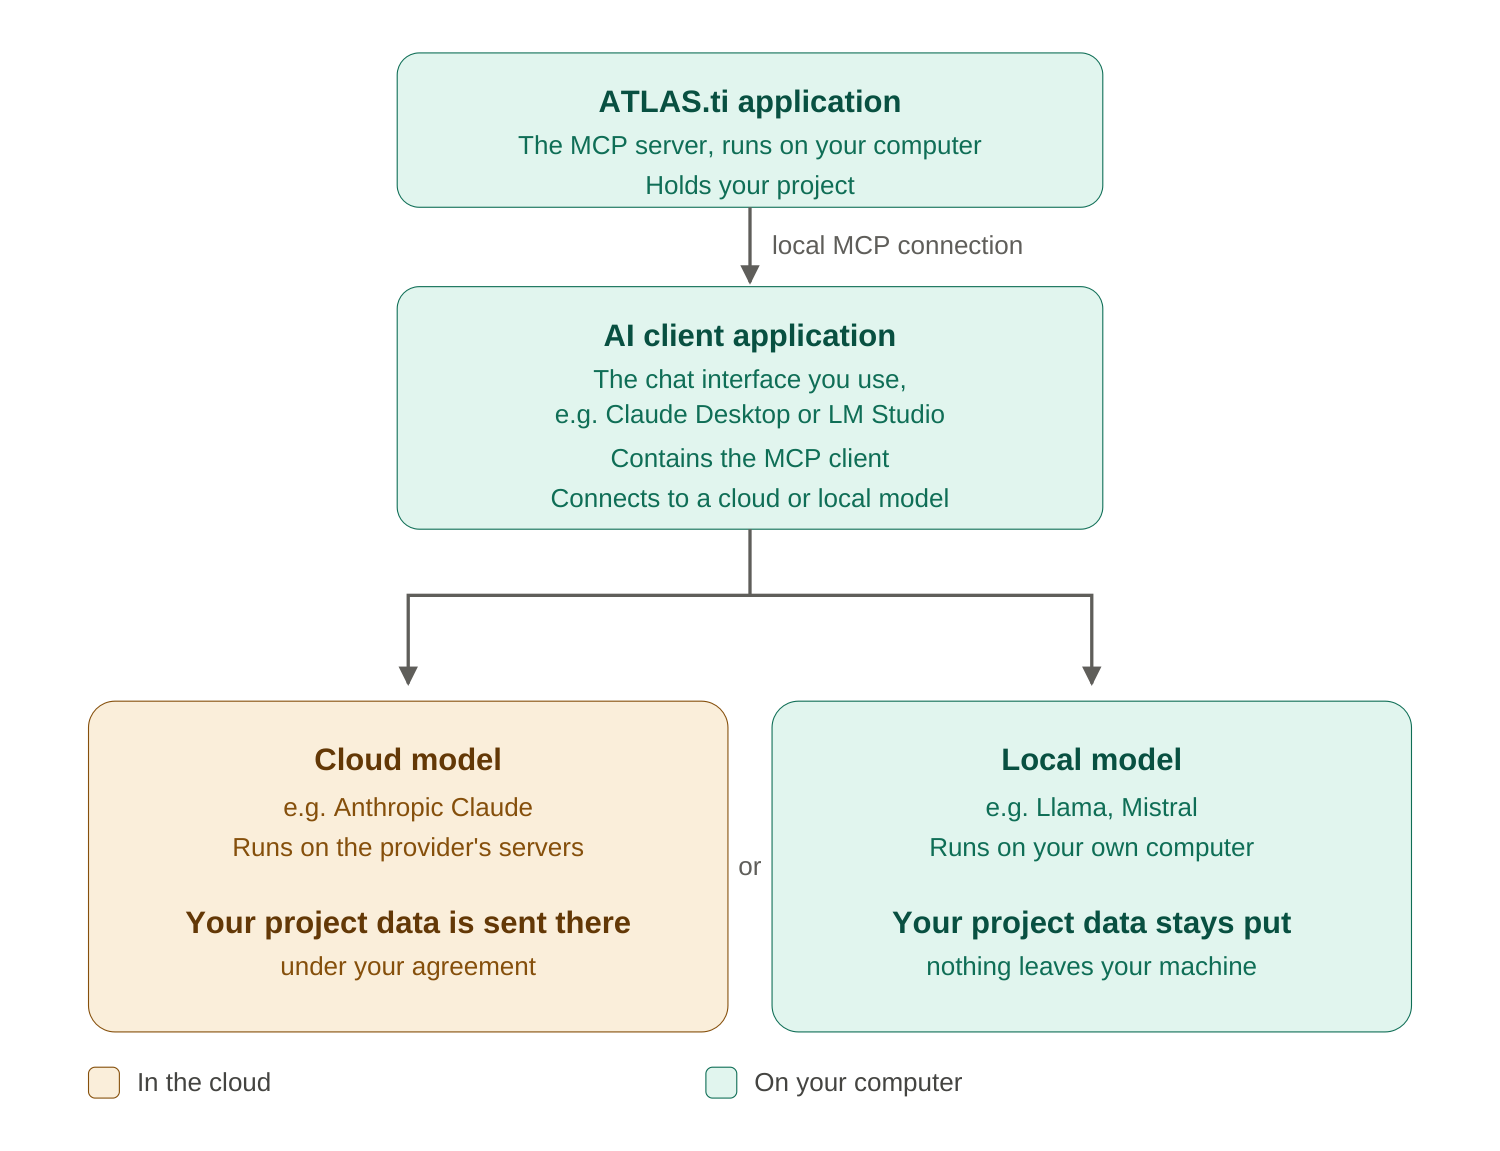
In short: your findings stay yours. Everything the assistant does is saved in your ATLAS.ti project – structured, portable, and permanent – not trapped in a chat session.
ATLAS.ti's Disable AI setting turns off ATLAS.ti's own cloud-based AI features – Conversational AI, AI coding, and AI summaries. It does not disable the MCP server, which is controlled separately. If your organization turns off ATLAS.ti's cloud AI for data-governance reasons, remember that the MCP integration is independent: whether any data leaves your computer depends entirely on the AI client you connect – a local model keeps everything on your machine, while a cloud client sends data to that provider.
Cost
The MCP integration is included in all active ATLAS.ti Desktop subscriptions at no extra cost. There is no separate add-on or fee.
You bring your own AI client. Any costs for that client are separate and depend on your choice – for example, a Claude subscription, usage-based fees from an AI provider, or simply the computing resources to run a local model on your own hardware. You are responsible for obtaining and maintaining any accounts or subscriptions your chosen AI client requires.
Getting started
- Choose a compatible AI client – see Tested AI Clients. We recommend Claude Desktop.
- Connect it to ATLAS.ti – see Setting Up an AI Client for step-by-step instructions.
- Open a project in ATLAS.ti and start asking your assistant for help.